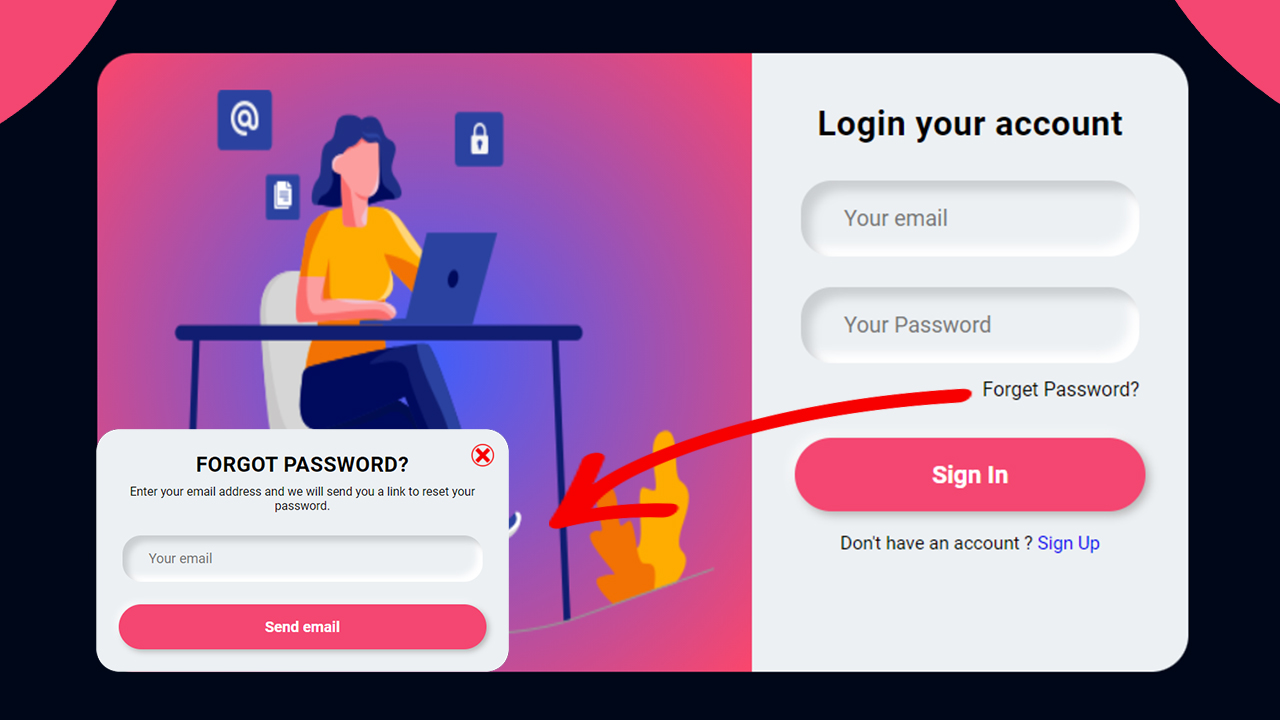
Welcome to our tutorial on how to create a Responsive Login Form Design using HTML, CSS, and JavaScript! A well-designed login form is crucial for any website, and making it responsive ensures a seamless user experience on any device. In this guide, you will learn how to build a Responsive Login Form Design that is both functional and visually appealing.
Throughout this tutorial, you’ll discover:
- Setting up the HTML Structure: Learn how to structure your HTML to create a Responsive Login Form Design that adapts perfectly to various screen sizes.
- Styling with CSS: Explore CSS techniques to style your login form, making it look modern and polished. A Responsive Login Form Design ensures your form is user-friendly and accessible on all devices.
- Adding Interactivity with JavaScript: Dive into JavaScript to implement interactive features for your Responsive Login Form Design, enhancing its functionality and user experience.
By the end of this tutorial, you’ll have the skills to design and implement a Responsive Login Form Design that will impress your users and provide a consistent experience across all devices.
Responsive Login Form design using HTML CSS And JavaScript
If you want to make a Responsive Login Form design using HTML CSS & JavaScript, then you have to follow the steps which are given below. Using these steps, you can easily create the Login Form.

Step 1: First, create an HTML file with the name of index.html and paste the given codes in your HTML file. Remember, you’ve to create a file with .html extension.
HTML CODE:
<!DOCTYPE html>
<html lang="en">
<head>
    <meta charset="UTF-8">
    <meta http-equiv="X-UA-Compatible" content="IE=edge">
    <meta name="viewport" content="width=device-width, initial-scale=1.0">
    <title>Responsive Login form in html, css & js</title>
    <link href="https://fonts.googleapis.com/css2?family=Roboto:wght@300;400;500;700&display=swap" rel="stylesheet">
    <link rel="stylesheet" href="css/style.css">
</head>
<body>

    <section id="section-wrapper">
        <div class="box-wrapper">
            <div class="bg-box">
                <img src="images/login.png" alt="">
            </div>
            <div class="form-box">
                <form action="#" method="POST">
                    <h4 class="form-title">Login your account</h4>
                    <div class="form-fields">
                        <div class="form-group">
                            <input type="email" class="user-email" placeholder="Your email">
                        </div>
                        <div class="form-group">
                            <input type="password" class="user-pass" placeholder="Your Password">
                        </div>
                        <div class="fpass">
                            <span class="fpass-btn">Forget Password?</span>
                        </div>
                    </div>
                    <input type="submit" value="Sign In" class="submit-button">
                </form>
                <p class="signin-here">Don't have an account ? <a href="#">Sign Up</a></p>
            </div>

            <!-- Popup box for password reset -->
            <div class="fpass-popup-box">
                <div class="popup-close">
                    <img src="images/close-button.png" class="close-btn" alt="">
                </div>
                <form action="#" method="POST">
                    <h4 class="form-title">FORGOT PASSWORD?</h4>
                    <p class="form-sub-title">Enter your email address and we will send you a link to reset your password.</p>
                    <div class="form-fields">
                        <div class="form-group">
                            <input type="email" class="user-name" placeholder="Your email">
                        </div>
                    </div>
                    <input type="submit" value="Send email" class="submit-button">
                </form>
            </div>
        </div>
    </section>
    <script src="js/app.js"></script>
</body>
</html>
Step 2: Now, create a CSS file with the name of style.css and paste the given codes in your CSS file. Remember, you’ve to create a file with .css extension.
CSS CODE:
*{
    padding: 0;
    margin: 0;
    box-sizing: border-box;

}

body{
    background: #000718;
    font-family: 'Roboto', sans-serif;
}
input:-webkit-autofill,
input:-webkit-autofill:hover,
input:-webkit-autofill:focus,
textarea:-webkit-autofill,
textarea:-webkit-autofill:hover,
textarea:-webkit-autofill:focus,
select:-webkit-autofill,
select:-webkit-autofill:hover,
select:-webkit-autofill:focus {
  -webkit-text-fill-color: #555;;
  transition: background-color 5000s ease-in-out 0s;
}

#section-wrapper{
    width: 100%;
    height: 100vh;
    padding: 30px;
}
.box-wrapper{
    position: relative;
    display: block;
    width:890px;
    margin:auto;
    margin-top:35px;
    border-radius: 30px;

}
.bg-box{
    width:60%;
    height: 505px;
    float: left;
    display: block;
    border-radius: 30px 0px 0px 30px;
    background: radial-gradient(circle, rgba(63,94,251,1)0%, rgba(251,70,107,1)100%);
}
.bg-box img{
    width:100%;
    height:100%;
    padding: 30px;
}
.form-box{
    width:40%;
    height: 505px;
    float: right;
    padding:40px 35px 35px 35px;
    border-radius: 0px 30px 30px 0px;
    background: #ecf0f3;
}

.form-title{
    text-align: center;
    margin: 0;
    font-size: 28px;
    letter-spacing: 0.5px;
}
.form-fields{
    width: 100%;
    padding: 30px 5px 5px 5px;
}
.form-fields input{
    border: none;
    outline:none;
    background: none;
    font-size: 18px;
    color:#555;
    padding: 20px 10px 20px 5px;
    width:100%
}
.form-group{
    padding: 0px 30px;
    margin-bottom: 25px;
    border-radius: 25px;
    box-shadow: inset 8px 8px 8px #cbced1, inset -8px -8px 8px #ffffff;
}
.fpass{
    margin-bottom: 25px;
    margin-top:-13px;
    text-align: right;
    font-size: 16px;
}
.fpass-btn{
    cursor: pointer;
}
.fpass-btn:hover{
    color: #f44771;
}
.submit-button{
    width: 100%;
    height: 60px;
    border-radius: 30px;
    font-size: 20px;;
    font-weight: 700;
    outline: none;
    border:none;
    cursor: pointer;
    color:#fff;
    text-align: center;
    background: #f44771;
    box-shadow: 3px 3px 8px #b1b1b1, -3px -3px 8px #ffffff;
    transition: .5s;
}
.submit-button:hover{
    background: #1e7dfa;

}
.submit-button:active{
    background: #0b63da;
}
.signin-here{
    text-align: center;
    font-size: 15px;
    padding:10px;
    margin-top: 7px;
}
.signin-here a{
    text-decoration: none;
}
.signin-here a:hover{
    color: red;
}

/* Popup box css */

.fpass-popup-box{
    position: absolute;
    background: #ecf0f3;
    padding:30px;
    border-radius: 30px;
    top: 100px;
    left: 23%;
    width: 550px;
    box-shadow: 0px 0px 300px 100px #000718;
    transform: scale(0);
    transition: all .4s;
}
.close-btn{
    width: 30px;
    position: absolute;
    top: 20px;
    right: 20px;
    cursor: pointer;
}
.form-sub-title{
    text-align: center;
    margin-top: 10px;
}

/* Responsive css */

@media only screen and (max-width: 767px){
    .box-wrapper{
        width:100%;
    }
    .bg-box{
        display: none;

    }
    .form-box{
        width: 100%;
        height: initial;
        border-radius: 30px;
    }
    .fpass-popup-box{
        width: 100%;
        left: 0;
    }
}
Step 3: Now, create a JS file with the name of app.js and paste the given codes in your JS file. Remember, you’ve to create a file with .js extension.
CSS CODE:
document.querySelector('.fpass-btn').addEventListener('click', function(){
    document.querySelector('.fpass-popup-box').style = 'transform: scale(1);';
})
document.querySelector('.close-btn').addEventListener('click', function(){
    document.querySelector('.fpass-popup-box').style = 'transform: scale(0);';
})


One Response
Love You Boss